Last year I planted freesia bulbs in my back yard; sadly squirrels dug up a lot of them. I recently planted the survivors into pots. I mounted an old spice rack to a wooden frame (my husband actually mounted it). I fastened a screen to the front to help deter unwanted pests. Fingers crossed...
Showing posts with label gardening. Show all posts
Thursday, May 26, 2011
Tuesday, May 24, 2011
Gardening Tip - Fingernails
Monday, May 9, 2011
Regrowing Onions
Sunday, May 1, 2011
Wednesday, April 13, 2011
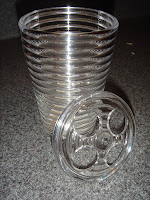
DVD-R Spindle
Question: what would you do with the stick that comes with the DVD-R Container?
Answer: plant seeds.
Wednesday, July 14, 2010
I LOVE Composting!
I've been backyard composting for over a year. I was so tired of piling up my neighbor's leaves and our mowed grass in the street for the City to pick up. It felt like such a waste.
SELECTING A COMPOSTER
There are many different types of composters available. This site gives detailed info and specs on compost bins for less than $100, but it isn't necessary to purchase a bin; my auntie digs a big hole and buries organic material.
I purchased an Earth Machine (EM) through a program offered by Santa Clara County Recycling and Waste Reduction Commission. The County offers a free composting class and the EM for $55. I did a lot of compost bin research and found the EM to be the best for the price. It is round, making it easier to turn the compost and the screw-on-top keeps out unwanted critters.
GETTING STARTED
I dug up a sunny dirt area in my backyard and placed the EM directly on top of the newly turned soil. I added the big pile of leaves and freshly cut grass; basically, adding equal parts of "browns", which are high in carbon, and "greens" which are high in nitrogen.
Brown: dry leaves*, cardboard (paper towel, toilet paper, wrapping paper tubes)
Green: grass, kitchen scraps (fruits, veggies, coffee grounds, tea bags, cut leaves)
NOTE: Do NOT add animal waste, meat, or dairy
I mixed them together, then added water. The mixture should be damp like a sponge, not sopping wet. After a few days of "cooking" the pile decreased in size.
I kept adding materials (trying to maintain the 50% brown, 50% green mixture), watering and turning the heap until the bin was 75% full. A couple of weeks later, I wasn't completely satisfied with the progress, so I mixed in roughly two gallons of compost that I'd gotten from the City to help the process.
COMPOST COMPLETE!
Four months later it was ready!** It looks like damp soil when done. I didn't water it for a couple of weeks (but continued to turn) to let it dry out a little then sifted out all the things that didn't break down completely (and put those things back into the bin for the next batch).
In the second batch, I added a lot more kitchen scraps and ended up with a bin full of earthworms. They must have come up from the soil under the bin.
I found this helpful Troubleshooting chart at the bottom of www.calrecycle.ca.gov for reference.
* The instructor in the class I attended said that anything that falls off a tree naturally (vs. cut) is considered brown
** Breakdown slows during colder months. Keep adding material and turning; it will begin cooking when the weather gets warmer.
Wednesday, July 7, 2010
Plant Food Jugs
Tuesday, July 6, 2010
Garden Booster
Wednesday, June 23, 2010
DIY 2 Liter Bottle Planters
I have been interested in DIY planters for a long time, so when I found these two tutorials (tut) I couldn't wait to get started. I planted basil in two different planters
(I had a few
young plants left over from a previous experiment*)
.
Self-watering Planter
I found this video tut on www.teachermadevideos.com. I was pleasantly surprised when this DIY self-watering planter actually worked. Instead of scrap cotton I used one of my son's worn socks to absorb water.
This worked so well, that I also made smaller ones using 16.9 oz. water bottles to grow mint plants (I'd read that ants do not like the smell of mint, but that's a future blog).
Upside Down Planter
This tut on www.cheapvegetablegardener.com shows how to make a hanging upside down planter. I was even more skeptical about this one, even though the Topsy Turvy has been proven to work.
*
Both of these planters would help decrease the damage from slugs and snails.
Monday, June 21, 2010
Slugs and Snails
This spring I had trouble with snails and slugs eating my newly planted beans. I performed an experiment in three separate slug infested areas to find a solution. Here are my results:
1. Copper pennies. This is a cheap version of copper tape. I'd read that pennies minted before 1983 have a high copper content and would give the slug/snail an "electric shock" when they slime over it. I gathered as many as I could find and circled my young sprout. It didn't work; the next morning the plant was gone. I could see a silvery trail over the pennies and after the first watering, I couldn't even see the pennies. FAILED.
2. Sluggo. Sluggo doesn't kill the slug/snail instantly, it takes a few days for it to work. After few weeks I found empty snail shells, but the plants were long gone. FAILED
3. Yogurt cups with Vaseline. I cut the bottom off a used yogurt cup slathering the top inch with Vaseline and buried the rim in the dirt (so they couldn't get under the cup). Watering didn't effect the Vaseline. I noted silver trail near the plant, but not on the cup. The photo on the left is after several pest free days. SUCCESS!
Tuesday, May 11, 2010
Plant Markers - Rock!
I'd been searching for a long time to figure out a way to mark plants in my garden. I tried using metal and plastic plant markers, but after one rainy season the ink wore off. I found this idea for a natural plant marker on the Martha Stewart website.
Monday, May 3, 2010
Unexpected Vases
Beverage Cup
I often indulge in a latte freeze from the food court of my local Costco for two reasons: the tasty beverage and the cool plastic cup.
The empty cup makes the perfect vessel to transport cut flowers. The straw hole is big enough to fit a few stems and since it's a cup it fits in a car cup holder! I've used them to send flowers home with my mom and also transported a few to my father's niche at the cemetery.
Toothbrush Holder
that later), I found this plastic toothbrush holder which turned out to be a great vase. The removable top makes it very easy to clean the inside. The toothbrush holes are angled in such a way that they hold stems upright and apart preventing the blossoms from bunching up; same engineering that prevents toothbrushes from "kissing".
Monday, April 26, 2010
Propagating Plant Stand
Sunday, April 25, 2010
Monday, April 12, 2010
TERRARIUMS
FRUIT/VEGGIE CONTAINERS
Place the container in full sun, but remember to keep the soil moist.
Open the lid once the seedlings reach the top of the container. Plant, or repot, seedlings in the ground when they reach 1 - 2 inches tall.
2 LITER BOTTLES
Subscribe to:
Posts (Atom)